Recently I wanted to start using Arduino embedded micro controllers, to refresh and improve my knowledge of electronics and telecommunications, the subject I studied back in the days at my beloved high school (Arturo Malignani in Udine, Italy).
On this post we will see how to connect an Arduino to the internet (and moving towards the “internet of things”) by using cheap components bought in eBay for less than $8!
Components
The components I used and their prices (as of May 2014) are:
- Arduino Pro Mini clone (search for “arduino pro mini” on eBay) – about $2 – 3 including shipping
- Ethernet Network Module based on the chip ENC28J60 (search for “Arduino ENC28J60”) – about $3.5 – 5 including shipping
NOTE: Make sure you purchase the model with the 3.3V and the 5V input as well. If you only get the 3.3V input you can’t plug the ethernet module to the VCC pin of your Arduino! Read more on how to purchase the correct model below.
The Arduino Pro Mini (and clones) do not have a micro USB port on the board, and that’s one of the reasons why they are cheaper than other models. If this is your first project with that model, you might need a USB TTL programmer (search for “usb to ttl uart 6 pin” on eBay). Please check with the vendor, as it might require some drivers for Mac, Linux or Microsoft Windows, depending on your preferences. The price of the programmer will not be a big issue, as it costs only about $2 including shipping.
How to confirm that the Ethernet Module is the 3.3 and 5V model, and not just the 3.3V one?
- In my case, turning the Ethernet module board upside down, I noticed a small voltage regulator (component model AMS1117), while the 3.3V board does not have the regulator.
- The dual in-line jumpers (to connect an Arduino to the module) are 6 per line, as it has 2 additional inputs for the 5V and for the additional ground. If there are just 5 pins per line, it is definitely the 3.3V model. Make sure that on the actual 6th column of pins has written on the board “5V and GND”.
Programming the Arduino Pro Mini
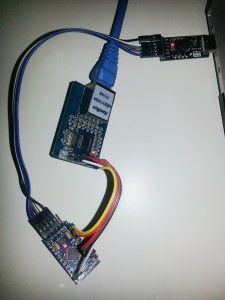
In my case, my USB TTL programmer is connected to the Arduino Pro Mini as follows:
| USB TTL Programmer | Arduino Pro Mini |
|---|---|
| GND | GND |
| 5V | VCC |
| RX | TX |
| TX | RX |
| DTR | GRN |
Now we need to select the correct board model, the correct serial port and the right programmer on the Arduino IDE.
In my case the board I selected is “Arduino Pro or Pro Mini (5V, 16MHz) w/ ATmega 328”, the serial port I used on my Mac is “/dev/tty.SLAB_USBtoUART” and finally the programmer I selected is “AVR ISP”
Connecting Arduino to the Ethernet Network Module
Connect the pins as follows:
| Any Arduino | ENC28J60 Ethernet |
|---|---|
| VCC (5V) | 5V (NOT the 3.3V pin!) |
| GND | GND |
| Pin 13 | SCK |
| Pin 12 | SO |
| Pin 11 | SI |
| Pin 8 | CS |
Now we can install the EtherCard library (compatible with the chip the ethernet interface uses) on the Arduino IDE and we are ready to connect Arduino to the internet, by loading one of the code samples provided by the library’s authors!

Challenges Encountered
As soon as I started using the library and connecting to websites, I tried accessing sites where I could use and consume information from (eg: Twitter, Facebook, my SugarCRM instance etc). With my disappointment, it seems like that’s not going to be possible because nowadays most websites use (as they should) SSL/HTTPS (HTTP Secure protocol) and unfortunately Arduino does not have enough computational power (both CPU and memory) to work with SSL encryption.
To connect to secure websites, I will have to use more powerful hardware with libraries that actually support HTTPS connections. Another simpler solution is to build a “proxy” site using a server-side language (eg: PHP) that accepts inbound HTTP connections from the Arduino (maybe locked behind an .htaccess that allows only specific IP addresses) that actually does the secure authentication and communication required, on Arduino’s behalf to the end website.
Nice tutorial, thanks. As per https I assume arduino is unreliable to consume modern websites data while for such targets a Raspberry Pi would better suit the need with nearly comparable costs. Let computers do the computers and microcontrollers their own. :)
Thank you for the kind comment Renzo!