Build a Sugar development VM using Debian 7.8
This post is supposed to guide through the setup of a VirtualBox virtual machine for local development of Sugar 7.5.x. The OS of choice is Debian 7.8 as it is my personal preference for server setups and it currently fits all the software requirements of Sugar without much additional manual work.
Prerequisites
- Valid Sugar license key and codebase (version used 7.5.2.0)
- Debian 7.8 iso file (in my case 64 bit)
- VirtualBox is installed locally
Basic Installation of Debian
First of all we need to create a new VM inside VirtualBox (select the name of the VM, the OS and finally the correct version. For my purpose Linux Debian 64 bit). Select the RAM available for the VM (At least 2GB is highly recommended if the machine hosting the VM has enough capacity), available disk space and disk image type. For the disk image I usually select VMDK as it is compatible with VirtualBox, VMWare and few other products as well.
Once the setup process of the new VM is complete, start the machine and select the Debian iso file to boot from, and to proceed with the installation of the OS.
Select the hostname to be “sugar” and the domain name as “local” (important for all the subsequent steps as the whole tutorial assumes the machine can be reached by the hostname “sugar.local”), select the root password and the additional details required by the users setup process (I created the users/passwords root/root and sugar/sugar for simplicity).
Continue with the disk partitioning process and the base OS installation. On the “software selection” section, unselect everything and then selecting only “SSH server” to have a minimal system without any GUI.
Additional Network Settings
Access the machine via SSH as root, to proceed with the setup.
Edit /etc/hosts and modify the following line:
127.0.0.1 localhost
to:
127.0.0.1 localhost sugar.local sugar
Now setup the network interfaces within the OS (adding a static and a dynamic one) by editing /etc/network/interfaces.
Change:
allow-hotplug eth0
iface eth0 inet dhcp
To:
allow-hotplug eth0
iface eth0 inet static
address 10.10.10.10
netmask 255.255.255.0

allow-hotplug eth1
iface eth1 inet dhcp
We need to modify the network settings on VirtualBox so that we can add the static network:
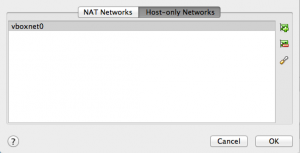
- On VirtualBox, click on “Preferences”, then “Network” and then “Host-only Networks” and finally add a network or click on “vboxnet0”.
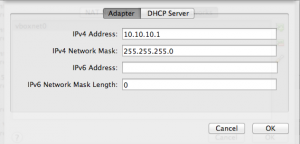
- On the IPv4 section type 10.10.10.1 and make sure that on the “DHCP Server” section, DHCP is disabled.
- Shutdown the VirtualBox machine (sending the “ACPI Shutdown” signal) so that the additional interface can be added to the virtual hardware.
- Navigate to the “Settings” and “Network” option of the VM.
- Attach “Adapter 1” to the “Host-only Adapter”, to “vboxnet0”. On “Advanced”, make sure to re-initialise the MAC Address to avoid problems.
- Enable “Adapter 2” and attach it to the “NAT”. Make sure to re-initialise the MAC Address as well.
- Start the VM and log in as root, making sure internet still works (eg: ping a website).
- To be able to make this setup work correctly, add on the host file the entry “10.10.10.10 sugar.local” (/etc/hosts if using Linux or OSX).

Now there will be two interfaces on the linux box, the first one on the Host Only network (10.10.10.* network without dhcp, using the static ip 10.10.10.10 for our internal communication) and the second one with access to the local internet connection via NAT.
To SSH into the machine from the local environment, first complete a ping test to sugar.local, and if it works fine then SSH into the VM as root (ssh root@sugar.local) so that the following commands/scripts can be easily copy/pasted.
LAMP Installation
Access the machine via SSH as root.
Update the system if required:
apt-get update
apt-get dist-upgrade
Install most of the required packages:
apt-get install unzip vim curl php5-curl php5-gd php5-imap libphp-pclzip php-apc php5-ldap php5-memcached memcached php5 apache2 php5-mcrypt
Install postfix as “Internet Site” and set the hostname to “sugar.local”:
apt-get install postfix
Install MySQL and its PHP support, setting the MySQL user and password (root/root for this article):
apt-get install php5-mysql mysql-server
Enable required/recommended modules:
a2enmod headers expires deflate rewrite
Configure a missing parameter on the standard mod-defalte by adding to /etc/apache2/mods-enabled/deflate.conf:
AddOutputFilterByType DEFLATE application/json application/javascript text/css
Create the folder /var/www/sugar:
mkdir /var/www/sugar
Add the “sugar” user to Apache’s group “www-data”:
adduser sugar www-data
Relax permissions and ownership on folder /var/www so that the group “www-data” (hence the sugar user) can write on it:
chmod 775 /var/www
chown -R www-data:www-data /var/www
Add sugar’s virtual host on /etc/apache2/sites-available/sugar:
<VirtualHost *:80>
ServerName sugar.local
DocumentRoot /var/www/sugar
  <Directory /var/www/sugar/>
    AllowOverride All
  </Directory>
</VirtualHost>
Enable the “sugar” virtual host just created:
a2ensite sugar
And finally restart Apache to apply all the changes:
service apache2 restart
The system should be setup with the following or more recent versions of the softwares:
- php: >=5.4.39
- apache: >=2.2.22
- mysql: >=5.5.43
Proceed with some of the PHP configuration.
On /etc/php5/apache2/php.ini change/add the following:
memory_limit = 512M
date.timezone = Australia/Sydney
post_max_size = 50M
upload_max_filesize = 50M
max_execution_time = 600
max_input_time = 600
error_reporting = E_ALL & ~E_NOTICE & ~E_STRICT & ~E_DEPRECATED
error_log = /var/log/apache2/error.log
realpath_cache_size = 256k
realpath_cache_ttl = 600
Add “apc_store” to “disable_functions”.
On /etc/php5/cli/php.ini change/add the following:
date.timezone = Australia/Sydney
error_reporting = E_ALL & ~E_NOTICE & ~E_STRICT & ~E_DEPRECATED
error_log = syslog
realpath_cache_size = 256k
realpath_cache_ttl = 600
Add “apc_store” to “disable_functions”.
To find out the full list of supported timezones, visit this PHP manual page.
Configure APC opcode caching settings by adding on /etc/php5/mods-available/apc.ini:
apc.shm_size = 250M
apc.shm_segments = 1
apc.ttl = 0
Restart Apache to apply the changes:
service apache2 restart
“sudo” installation
To be able to run commands as root, even if not logged in as root, the software Sudo can be installed..
This is not an essential step but as I am used to it on the Ubuntu world, below are the steps on how to install and setup the software.
Access the machine via SSH as root and install Sudo with:
apt-get install sudo
Add the sugar user created at the beginning, to the Sudo group:
adduser sugar sudo
Logout from the VM and login as “sugar” (ssh sugar@sugar.local). From now on, when it is required a privileged user to complete an action, run “sudo <command>”.
We can then disable the user root from accessing the system via SSH (only complete if the previous step works correctly).
On /etc/ssh/sshd_config change:
PermitRootLogin yes
to:
PermitRootLogin no
Restart SSH:
sudo service ssh restart
ElasticSearch
Sugar 7.5.2.0 requires ElasticSearch 1.4.4 as its own search engine, as described on the supported platform documentation.
Access the machine via SSH as sugar to install Java:
sudo apt-get install openjdk-7-jre
Download and install version 1.4.4 of ElasticSearch:
wget https://download.elasticsearch.org/elasticsearch/elasticsearch/elasticsearch-1.4.4.deb
sudo dpkg -i elasticsearch-1.4.4.deb
Configure the software by adding into /etc/elasticsearch/elasticsearch.yml the following:
network.bind_host: localhost
action.disable_close_all_indices: true
action.disable_delete_all_indices: true
action.disable_shutdown: true
script.disable_dynamic: true
Make ElasticSearch’s service start at boot:
sudo insserv elasticsearch
Restart ElasticSearch to apply the changes:
sudo service elasticsearch restart
Finally test if ElasticSearch is working:
curl -X GET 'http://localhost:9200'
The output should be something like this:
sugar@sugar:~
nbsp;curl -X GET 'http://localhost:9200' { "status" : 200, "name" : "Powderkeg", "cluster_name" : "elasticsearch", "version" : { "number" : "1.4.4", "build_hash" : "c88f77ffc81301dfa9dfd81ca2232f09588bd512", "build_timestamp" : "2015-02-19T13:05:36Z", "build_snapshot" : false, "lucene_version" : "4.10.3" }, "tagline" : "You Know, for Search" }
To know more about elasticsearch, setup, best practices, scaling and security settings read Sugar’s documentation.
Additional useful configuration settings can be found on this GitHub gist url.
Sugar’s background processes, the cronjob
The easiest way to complete this, given that we might install/move Sugar at any time, is to create a cronjob file that will run Sugar cron only if the correct file exists. As an example, the file /usr/local/bin/sugarcron can have the following content:
#!/usr/bin/php
<?php
// Enrico Simonetti
// 2015-05-09

$folder = '/var/www/sugar';

if (is_dir($folder) && file_exists($folder . '/cron.php') && is_readable($folder . '/cron.php'))
{
  exec('cd '.$folder.' && php -f cron.php');
}
Make it executable:
sudo chmod +x /usr/local/bin/sugarcron
Then add into /etc/crontab the line to execute every minute the file “/usr/local/bin/sugarcron” as the user “www-data”:
* * * * * www-data /usr/local/bin/sugarcron > /dev/null
Fix Sugar’s permissions: a simple utility
Create a new file /usr/local/bin/sugarfixpermissions with the following content:
#!/bin/bash
cd /var/www/
sudo chown -R www-data:www-data sugar
cd sugar
sudo find . -type d -exec chmod 775 {} \;
sudo find . -type f -exec chmod 664 {} \;
sudo find ./bin -name sugarcrm -exec chmod 500 {} \;
echo "Permission fixed"
Then make it executable:
sudo chmod +x /usr/local/bin/sugarfixpermissions
Every time there are issues with the permissions on the Sugar system just run:
sudo /usr/local/bin/sugarfixpermissions
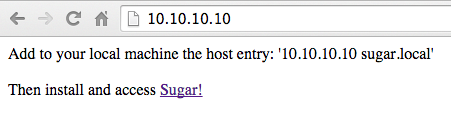
Default web server message
The sugar system will have the url “http://sugar.local”. If the web server is accessed in any other way, a message should be shown on how to properly access the system.
Delete the file /var/www/index.html and add /var/www/index.php with the following content:
<?php
echo "Add to your local machine the host entry: '" . $_SERVER['SERVER_ADDR'] . " sugar.local'<br/><br/>";
echo "Then install and access <a href='http://sugar.local'>Sugar!</a>";
Access the filesystem from the local machine
To be able to achieve this goal, simplify the development and allow the use of the preferred local PHP editor, a service such as Samba can be installed. Then it will be possible to mount on the local system, the VM file system as a remote drive.
Mounting the drive locally will also make sure that the permissions are always correct, as they are enforced by the Samba configuration. Personally I use vi/vim to code, but please note that Samba could slow down the experience created by the local editor as Samba adds quite a bit of overhead.
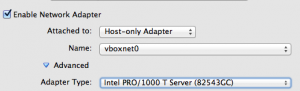
During configuration’s testing, I realised that changing the VirtualBox virtual network card to “Intel PRO/1000 T Server” helped with Samba’s performance.
Install Samba:
sudo apt-get install samba
Configure Samba (/etc/samba/smb.conf) to setup automatically the right user ownership and permission:
[global]
log level = 0
socket options = TCP_NODELAY IPTOS_LOWDELAY
security = user
[sugar]
path = /var/www/
available = yes
browsable = yes
writable = yes
force user = www-data
force group = www-data
create mask = 0775
directory mask = 0775
force directory mode = 0775
force create mode = 0775
case sensitive = true
Restart the service:
sudo service samba restart
Create a password for the user “sugar”. I chose “sugar”:
sudo smbpasswd -a sugar
Now it should be possible to mount the /var/www folder of the server in the local environment as a Samba shared drive.
For OSX use the path “smb://sugar.local”.
In case there is an anti virus enabled, make sure the scanning of the mounted Samba shared folder is disabled, as it might noticeably slow down the performance of Sugar, especially during the regeneration of the cache files.
Allow remote MySQL access
To allow to remotely connect to MySQL from the local machine, change bind-address from 127.0.0.1 to 10.10.10.10 on /etc/mysql/my.cnf.
Restart MySQL to apply the change:
sudo service mysql restart
Finally add a user (user/password sugar/sugar for development purposes) with:
mysql -u root -p
Then run (make sure single quotes have not been replaced on the command syntax):
use mysql
GRANT ALL ON *.* to sugar@'10.10.10.%' IDENTIFIED BY 'sugar';
GRANT ALL ON *.* to sugar@'localhost' IDENTIFIED BY 'sugar';
FLUSH PRIVILEGES;
exit
Finally test mysql access from the local machine with “mysql -u sugar -h sugar.local -p” with the new password.
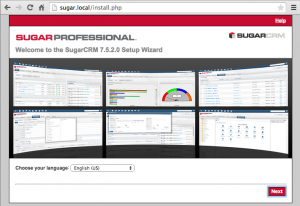
Installation of Sugar
Now that the infrastructure is setup, it is pretty trivial to follow the installation wizard of Sugar.
Unzip the software files into /var/www/sugar. If the action has been completed via command line, fix the permissions with:
sudo /usr/local/bin/sugarfixpermissions
Follow the wizard installation by accessing the url: http://sugar.local
When requested, enter the following details:
- Host Name: localhost
- Database Administrator Username: sugar
- Database Admin Password: sugar
Proceed with the software setup, leaving ElasticSearch settings as prompted by the system.
Optimise Sugar config
On “config_override.php” within the installation of the system add the following settings to enable memcached in-ram caching and to disable any other caching method:
$sugar_config['external_cache_disabled'] = false;
$sugar_config['external_cache_disabled_wincache'] = true;
$sugar_config['external_cache_disabled_redis'] = true;
$sugar_config['external_cache_disabled_smash'] = true;
$sugar_config['external_cache_disabled_apc'] = true;
$sugar_config['external_cache_disabled_zend'] = true;
$sugar_config['external_cache_disabled_memcache'] = true;
$sugar_config['external_cache_disabled_memcached'] = false;
Some other suggested settings for config_override.php, useful to speed up the environment and debug slow queries are below:
$sugar_config['disable_vcr'] = true;
$sugar_config['disable_count_query'] = true;
$sugar_config['save_query'] = 'populate_only';
$sugar_config['logger']['level'] = 'fatal';
$sugar_config['dump_slow_queries'] = true;
$sugar_config['slow_query_time_msec'] = '1000';
MySQL tuning
To tune the database it is suggested the use of a Perl tool called MySQLTuner that helps with tweaking settings based on some system’s history.
The only caveat is that the MySQL server should run for a while to be able to build up usage history.
Disclaimer
This tutorial helps with the creation of a local VM for Sugar development. It helps quickly prototype solutions, snapshot, copy and destroy VM when/if required.
It is supposed to be used just as a guideline and it is not intended to be a full guide on how to setup a system for production purposes.
Some of the settings used on this article can be quite helpful, as they will help with the setup of a live environment, but there are many other best practices that should be observed when setting up a production system.
There is no SSL configured during the installation, therefore do not choose an official password for the sugar instance as it won’t be secure. Never setup an environment with sensitive data without SSL!
For the same reason, and for the fact that all passwords suggested on the post are trivial, do not install any customer data on this instance.
The blog post has been written in May 2015, using Debian 7.8 with the most recent available versions of the LAMP stack at the time. Sugar Enterprise 7.5.2.0 and 7.6RC4 run successfully on this setup during the tests.
Your Input Is Welcome
If you have suggestions or comments on how to improve usability, performance, security, setup procedures etc. or anything else you can think of, please do not hesitate to add a comment below, thank you!
Subsequent edit on May 2017
What about docker containers?
Recently I built a set of docker stacks that can help.
The docker stacks with instructions are available on the two GitHub repos below:
Note that the Sugar application’s code is obviously not included.
Credit goes to Cédric Mourizard for the initial work with Docker.
Do you have a guide for Debian 8 and SugarCRM 7.9 for a production environment?
If not, what changes or additional steps would you take on top of this guide?
This guide was really helpful. Thank you!
Hi Lloyd,
thank you for your kind comments!
Frankly, the settings for a production environment are a little trickier.
They do depend on many variables and case by case needs (eg: they can change based on your DR strategy and HA strategy, on your usage patterns, if there are integrations involved, how many records are present on the database, if it is a cloud or bare metal installation and the list goes on).
I did create a docker based dev/test environment for Sugar 7.9. You can find the link the bottom of the article. Feel free to have a look at the settings I used there. That could be a good starting point for you, especially on the PHP side. You will have to work more on the Elastic and MySQL side for performance tuning for sure.
Hope it helps!